Monday, April 25, 2011

Silk flowers


I grew up a fresh flower snob, an attitude gleaned from my mother, to whom silk flowers (the affordable ones, anyway) were tacky, dusty things that never came into the house.  So the only greenery to grace our house were a couple of tired african violets, a spider plant, and the ubiquitous pothos.  Prices have dropped, quality has improved, but old prejudices die hard, and it wasn't until this past week that I bought my first artificial sprig to stick in a vase.

I eased into silk flowers with wreaths - a wreath on the door says that a home is cared for, I think (the man of the house has similar feelings about seasonal flags, so we usually have a banner on the flagpole and a wreath on the door to distinguish our house from the others in our cookie cutter subdivision).  And surely decorating a west-facing sun-beaten door is justification for using silk flowers.  Inspired by a gorgeous, real hydrangea, I made a foray into the floral aisles of a local craft shop for some white and green blossoms. My 4-year-old spotted some "roses" (ranunculus) and insisted that they needed to be in the wreath, too - and how could I ignore his opinion?  A stem of dogwood caught my eye, and I picked that up, too, thinking to work it into the wreath.

Fortunately the ranunculus blended well and filled in a few empty patches, but there was definitely no need for the dogwood.  Darn, because I do love dogwood blossoms, and they don't do well here in the south - no hope for live ones.  But propped up against my blue walls, they made me happy... dare I just stick them in a vase, artifice notwithstanding?


I dared.
And am now wondering what other long-held opinions it is time to put aside in favour of some new ideas.

I still do love my live flowers, and have a couple of dozen orchids that delight me with their blooms... but that will have to be another post.

Metamorphosis

4/13/11 1:33pm

4/13/11  1:54pm

4/13/11 1:59pm

4/13/11 2:20pm

Easter Sunday, after church, we came home to this:
The previous night the chrysalis had gone from jade green to clear and showing the black and orange butterfly within. 

Since her wings had stiffened and she was flapping around, it was time to let her go.

Thursday, April 21, 2011

Long-sleeve onesie to Short-sleeve T-shirt

As the weather warmed and the girlie outgrew her winter clothes, I thought I'd try to make things stretch out a little longer. 

Before:

After:

An 18-month long-sleeve onesie has been remodeled into a 3T t-shirt, inspired by some ideas from the blog of a much more talented seamstress than I .  Here's how:


Cut the sleeves and bottom off of the longsleeve onesie, taking into account a 1/4" seam allowance on the sleeve length.

Cut the cuffs off the sleeves, again allowing for a 1/4" seam allowance, and save.  Cut along the seam of the remaining tube of sleeve fabric to open it up into a rectangle.  Cut this into strips of fabric (7/8" inch looked good to me; you can use whatever width strikes your fancy).

Sew a basting stitch down the center of these strips, overlapping about 1/4" between adjacent strips, until you have a long piece about twice the circumference of the bottom edge of the shirt.

Gather into uniform ruffles and sew onto the bottom edge of the t-shirt with a narrow zig-zag stitch so the seam will stretch a little with the knit fabric:


For the sleeves, take the cut-off cuffs and pin to the sleeve edge, right sides facing and raw edges together.  Since the cuffs are narrower than the short sleeve edge, you'll have to stretch it out to fit it evenly all the way around.


Sew in place with a narrow zig-zag stitch to give it a bit more stretch.  Flip the cuff right side out, and you've got a finished sleeve!  Steam iron the edges towards the sleeve.  For instructions on a cuff using an unfinished strip of cloth, check out Make It and Love It where I got some of my ideas.

Here's a slightly different take on the bottom ruffle, this one gathered and sewn on one edge, and then topstitched. 


Tuesday, April 12, 2011

Butterfly Hatchery

Yesterday the kids found 3 big monarch caterpillars on our milkweed, and since our old butterfly hatchery had disintegrated in the Florida heat and sun, it was time to make a new one.
The old one had been made of netting from the fabric store.  This time I had some extra screening leftover from rescreening a couple of ripped panels in our porch, so I put it to good use, in hopes that this one will last a little longer.

Want to make one?  Here's what you'll need:
  • 2 same-sized plastic plates (larger is better)
  • screen material, about 2 feet long and wide enough to encircle the plates with about 6" of overlap
  • enough screen material to cover one of the plates
  • 2 strips of scrap fabric, each about 5 inches wide, and long enough to go around your plates
  • ribbon


Start by drilling or punching 4 holes into your plate (we used frisbees from a restaurant that served their kids meals on them) and threading ribbon through it to hang it by.  Use your plate as a template to trace a piece of screening to cover the inside of the top plate with.  Chances are this is where the caterpillar will go to hang out and turn into a chrysalis, and the screen will to help the newly hatched butterfly hang on to the underside of the plate, which otherwise may be too smooth for it to cling onto while its wings harden.  Without it, you may have some fall casualties.

Hot glue the screen onto the plate.  You can easily do this by applying glue to the outside of the screen and just pressing it against the plate with the glue gun nozzle.  Any lumps of hot glue that cool before the screen is attached can be melted by holding the nozzle against it for a few seconds.  The finished edge will look something like this:


Next, cut your strips of fabric and screening.  The fabric needs to be about 5 inches wide, and long enough to encircle the plate.
Remember, you need to have your screen overlap by at least 6 inches to help prevent wandering caterpillars from escaping (or hungry lizards from getting in).  Wrap your cylinder of screening around the plate to check for size, then pin in place:


Sew a narrow casing on one long edge of each strip of fabric; this will become the drawstring ribbon closure.


Sew the other edge of the strip of fabric onto the tube of screening by placing it on the outside of the tube, right side down (towards the screen) and matching edges:

When you've done this to both edges, flip it up and thread your ribbon through the casing:


Slip your plates in and tighten the drawstrings:

A block of wood with a hole drilled in it is great for holding a vial of water with your sprig of caterpillar food in it. 

You can also use a covered yoghurt container with a small X cut into it to insert stems into.  Don't use an open cup of water - caterpillars can't swim.
Now go get your caterpillar, and feed it and watch it grow!  To add caterpillars and plants, just open along the overlap in the screen.  When your butterflies hatch from their chrysalides (a process called eclosion - hey, you learned a new word!), after their wings harden, release them by undoing the drawstring at the top and removing the top plate.

Unfortunately by the time I got the hatchery ready, 2 of the 3 caterpillars had disappeared.  So much for eating poisonous milkweed plants.  Here is the last one; in a couple of weeks we hope to have butterfly pics!

One last note; before you use this again for another set of caterpillars, clean it out, spray it with bleach, and rinse, to kill any bacteria that can infect caterpillars.


Monday, April 4, 2011

Outdoor chandelier


About half a year ago, since I was running out of shelf space, I put up a bar to hang orchids from in the screen porch.
It was definitely less form than function: electrical conduit (the cheapest way, per foot, to get a sturdy rod), chain, eye-bolts through the porch frame and conduit, and quick links to hook it all together.
As it turned out, it wasn't that functional either, since in order for the plants to get any light, I'd have to hang the bar so low that the roots were brushing the table below.  So the orchids went back on the tree, and the bar just hung there, until I found these strings of lanterns on sale last week:

We've been needing more light on our porch, and the bar turned out to be the perfect frame for a chandelier:

Someday I may get up the energy to do it right - get out the ladder, pull it all down, take the lights off, spray paint the rod and chain an espresso brown, and put it all up again - but for now I'm just enjoying my new lights.

Friday, April 1, 2011

The 4 R's

Reuse, Reduce, Recycle.... and Ruffles.

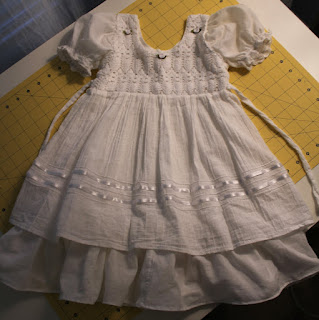
I love repurposing and extending the life of just about everything... and with a little girl who grows too quickly, ruffles are just magic.  We got some great hand-me-downs that I loved, but were just a bit small - the jeans were highwaters, and the dress was short and tight around the arm holes. 


A ruffle of scrap fabric fixed the jeans, and cannibalizing an old blouse of mine for a ruffle and sleeves, we had an entirely new dress.  The dress had an underskirt which I sewed a wide ruffle onto, and after widening the arm holes, I sewed on the new sleeves (taken from my blouse, but trimmed down to size and given some fresh elastic).


Next up: to try to convert a too-small long-seeve onesie into a T-shirt for potty-trained, summertime wearing.